Your Basket is empty

GET 20% TO 60% OFF EVERYTHING - YOUR LOVE + OUR DISCOUNT = THE PERFECT GIFT FOR MOM SHOP NOW

The Personalized Picture Wall: Tips and Ideas
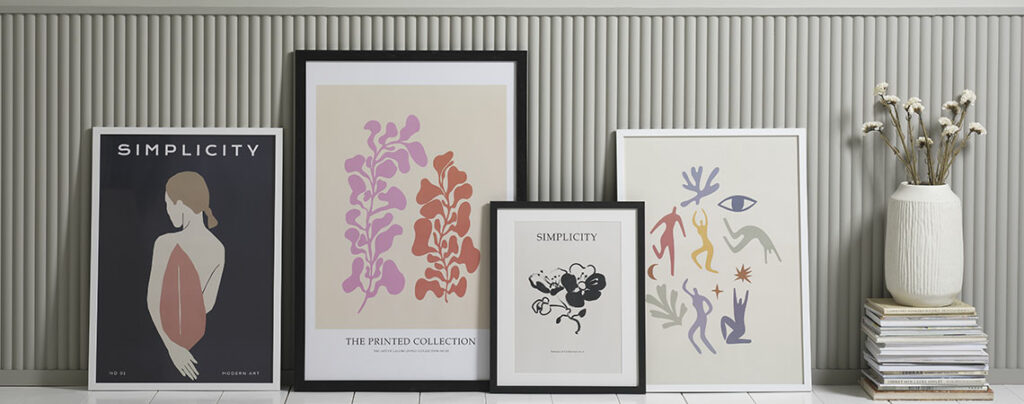
Date: September 22, 2023

Category: Inspiration

There are countless different options if you want to create a picture wall. Whether you are into prints, graphic illustrations or family photos, you can find inspiration here to create a personal picture wall.

When you have to create a picture wall, it is important that it suits you and the style of your home. First of all, you must make a plan – so that you get a result that you are satisfied with and avoid making unnecessary holes in the wall. Get our best tips here.

1. Start with a plan

Start by considering:

  • Where should the pictures hang?
  • How much space do you want to use on the picture wall?

Once that is in place, you can start planning which pictures you want to hang and what the pictures should fit in the room. This applies to both the room’s colours, style and decor. Should the pictures, for example, hang above a piece of furniture or flush with a door frame?

2. Image selection

There is free choice when you need to find images for your picture wall: You can find inspiration on the internet, from friends or in galleries, and you can handpick photos, posters, drawings, prints, paintings and mirrors or combine them with wall lamps, reliefs, tapestries or whatever else you want.

You can choose a theme, a color, a motif or some special shapes as the focus. In this way, you can also avoid a confusing or messy expression.

A picture wall with photos and illustrations that mean something to you is the perfect way to collect your memories in a place where you can always see them.  

You can find your pictures online and print them yourself, or you can buy the pictures online or in a physical store. There are many different options, and it is largely also about how much money you want to spend on your new picture wall.

3. Dark or light picture frames

The colour of your picture frames is very important for the overall overall impression of the wall and the connection with the rest of the room. A  black picture frame  emphasizes the image, whereas a light or wood-colored frame makes the image flow more. 

The width and thickness of your frames also have an effect on how your pictures appear on the wall. Wide frames separate the motifs more and make the pattern clear, whereas narrow frames focus more on the motifs and give a minimalist impression.

The combination of different colours and materials can work well and create a dynamic expression, but perhaps you prefer more calm and balance, and then it is a good idea to choose frames in the same colour or design.

4. How should the pictures be placed in relation to each other

Once you have selected the room, the wall and the pictures you want to hang, it’s time to get more practical.

Whether you are into stringy and minimalist picture walls or more random compositions depends on taste and personality. It is always a good idea to strive to follow a common thread in the composition to ensure a harmonious picture wall.

Start by laying out the pictures on the floor so you can decide which one should be in the center and build the rest of the picture wall from that. Try out a few different options and take pictures along the way each time you’ve made a design that you’re happy with.

Try, for example, setting up the pictures in a square, sorting them by size or symmetrically. Your images can also align on either the horizontal or vertical axis. Only your imagination sets the limit.

Finally, you can compare your different options so that you end up getting what you like best.

5. Distances between pictures and other elements in the room

A rule of thumb says that there should be between 5 and 15 cm between each frame. You quickly discover what looks nice when you put the pictures on the floor. 

The center of the picture wall must be approximately at eye level, i.e. at a height of 1.60 m. But no rule without exceptions. You can choose to hang the pictures from floor to ceiling, or to let the top edge align with, for example, the top edge of a door frame, if it looks nice. It’s a good idea to make sure you have room to expand the picture wall over time.

6. Hang the pictures

Now you are ready to hang the pictures. Mark with a pencil where the nail/screw should be before starting with the tool. Make sure the nail/screw can support the weight of your images. A hook can make it easier to hang the pictures – otherwise try to hammer in the nail so that it slopes upwards.

If the pictures lean slightly to one of the sides when you have mounted them, you can put a piece of “elephantsnot” on the back of the frame to hold them in place. 

7. Picture walls – an idea for creative interior design

A picture wall gives you the opportunity to express yourself creatively – also in the future. The picture wall can be constantly in motion, and you can continuously replace pictures, add new or remove pictures. The picture wall quickly provides a dynamic and colorful input to a room and is the perfect way to reflect your personality. Get more ideas for personal decoration .